DIY Fireplace Building Plans
Hi There!
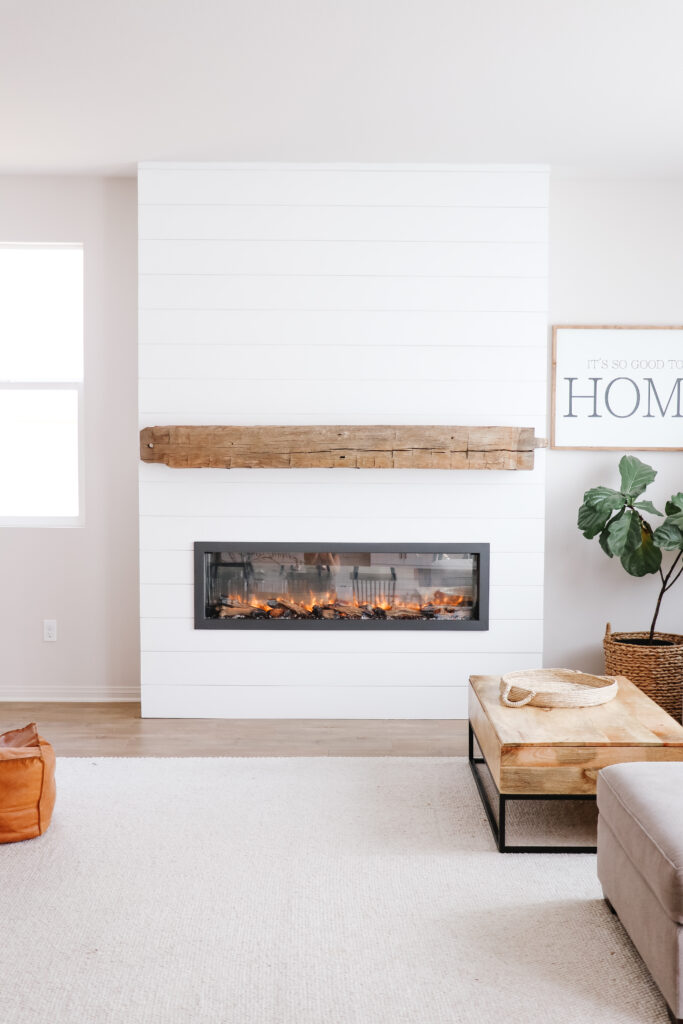
This is Aaron, Megan’s husband. If you’re reading this blog post it’s likely because you watched our “DIY Shiplap Electric Fireplace Build with Mantel” video on YouTube! From that video, we have received a lot of questions and requests for a plan to download / purchase to build a similar fireplace.
DIY FIREPLACE BUILDING PLANS
I’m sorry to say, we do not have a building plan! I designed our project as I went, made a few mistakes and did not write down any of my measurements because I didn’t build with the intention of creating or sharing a plan. However, since so many have asked for one I wanted to write a follow-up blog post for this project and do my best to answer some my thought process on this project, supplies I used etc in hope that is at least a little helpful!
So while we don’t have a step-by-step building plan to sell, I do provide a lot of free tips and insights in the building process below! Hopefully these tips are helpful as you begin your own project!

Before You Get Started… Measurements & Dimensions
Before building your own fireplace you’ll need to take into consideration the following:
– How high you ceilings are
– How big the fireplace you’ve purchased is, ours is 57 inches. The fireplace we used has a new model that you can see on Amazon and Home Depot, it is virtually the same but has a different frame, one that is a little thinner and is not removable. This is actually an upgrade since our kids often knock the frame off of ours, which is attached with magnetics that are strong, but no match for toddlers!
– How wide you want your total project to be
– Size, type and height of mantel
Our Fireplace Dimensions
This is the size of our project…
108 inches tall
78 inches wide
14 inches deep
These dimensions work for our ceiling height and room size. However, always adjust measurements so it works for your space and ceiling height 🙂
Supply List for DIY Fireplace
Here’s what you’ll need to build this project! I’ve listed everything below and added links. I altered the design to correct the two mistakes I’ve listed above.
- (11) 10ft – 2×4”
- (2) 8ft 2×6”
- (1) 8ft – 1×8”
- 3” wood screws
- (14) 12ft Shiplap Boards
- Nail Gun
- Nails
- Drill / Driver
- Miter Saw
- Oscillating Saw
- Paint Roller
- Foam Rollers
- Paint Tray
- Spackle Kit
- Latex Caulk
- Sanding Sponge
- ECOS Paints
- ECOS Matte Paint: White
- Fireplace: Dynasty Harmony 57″: NEW MODEL: Amazon and Home Depot
Photo Process of FIY Fireplace Build
Below are some photos during the build process with text and measurements added to help guide you through my build and thought process!


Mistakes I Made On This Project
Two things I would probably do different next time are…
– I used a combo of 2×4 and 2×3 lumber. I did this because I was trying to make the framing lighter in weight and save a few dollars, but it really just caused confusion.
– I changed part of the design during the build which meant a lot of the lumber I bought at 8ft length would have been better to buy at 10ft.
FAQs
How to fill gaps at the edges… I used this spackle to fill nail holes and gaps and this latex caulk around the edges where the shiplap touches the ceiling/wall.
Where does the heat go? Since this fireplace is electric, it produces no heat if you just have the flames turned on. When you use the heater function, a blower pushes the heat out the front from along the top edge of the glass.
Outlet Access: I left one piece of shiplap, down low on the right side, easily removable, so that I can reach the outlet.
Mitering the Shiplap Corners: I used a chop-saw to cut the 45 degree corner for each piece of shiplap. Honestly that was the toughest part of the project as the shiplap were not all 100% flat and something about the saw blade made it difficult to get perfect corners. It is possible a table-saw would have worked better.
Finished Project!
This project is actually not completely done! I will be adding lower cabinets on both side of the fireplace. This will provide more living room storage and complete the entire look. However, here are some photos of the completed fireplace and how we’ve style it over the year for various Holidays and celebrations!