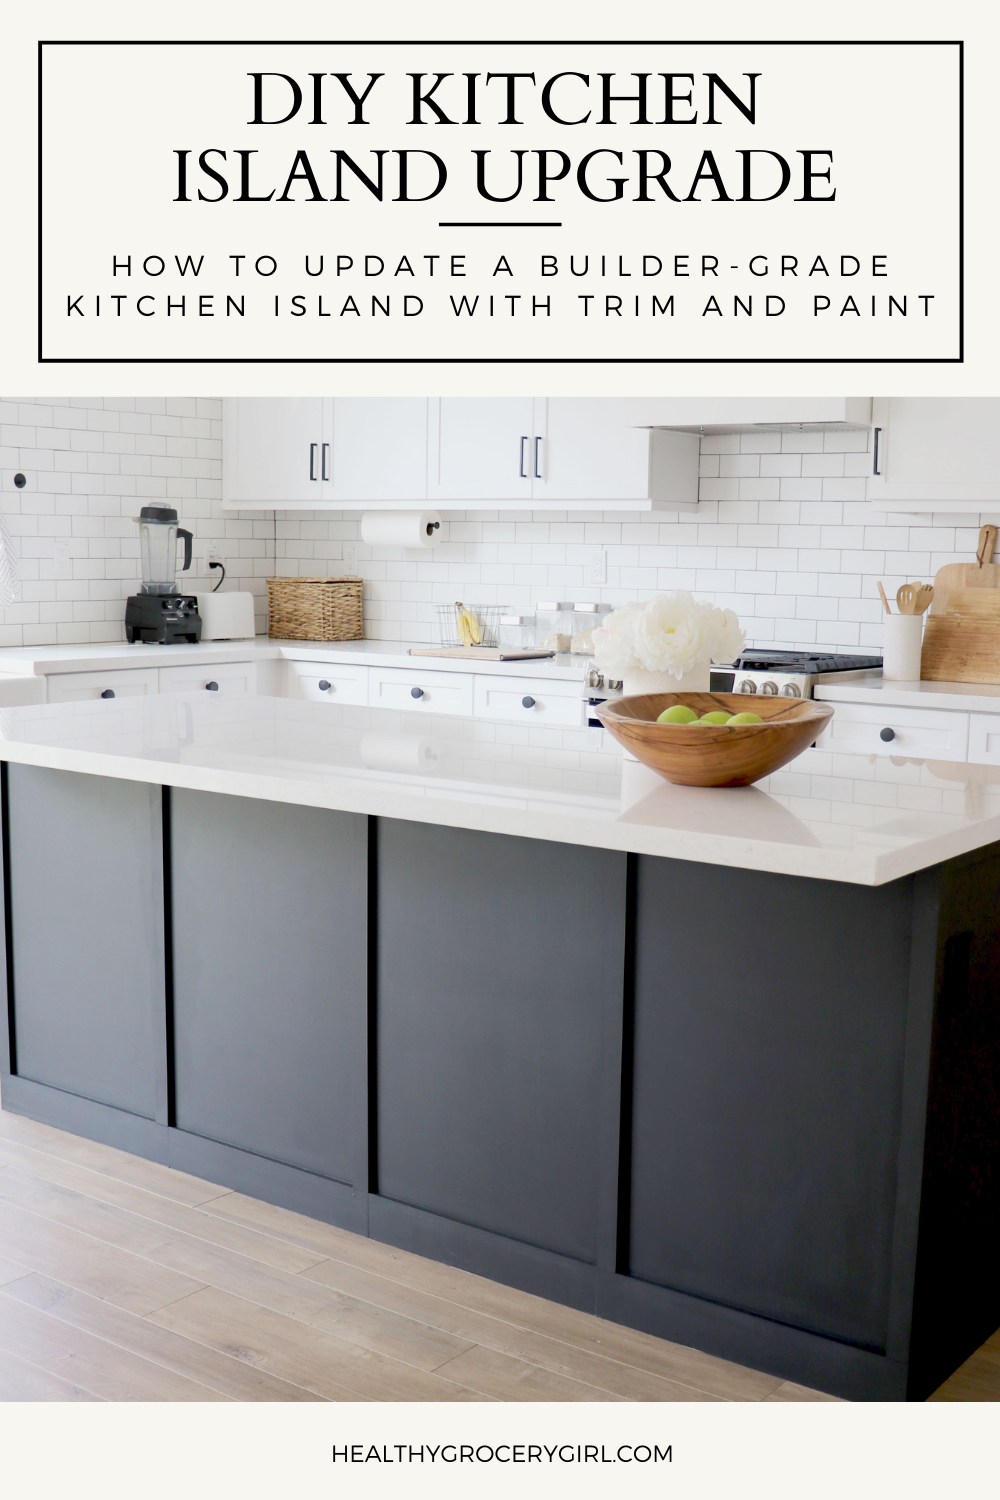
DIY Kitchen Island Upgrade
We love a good DIY Home Project! Today we are sharing how we turned our builder basic kitchen island into an island with warmth and character! We did this by adding board and batten trim and a few coats of paint! It really was an easy, budget-friendly kitchen makeover project that adds so much to this space. Typical for our home projects I start the process by coming up a design and look I have in mind and then Aaron brings it to life! Since Aaron is the master builder he is going to share with you the details of this project. If you have any questions, please leave them in the comments under our YouTube video here and we’ll do our best to reply to them as soon as we can!
Watch The Process! DIY Kitchen Island Upgrade Video…
How To Upgrade A Builder-Grade Kitchen Island
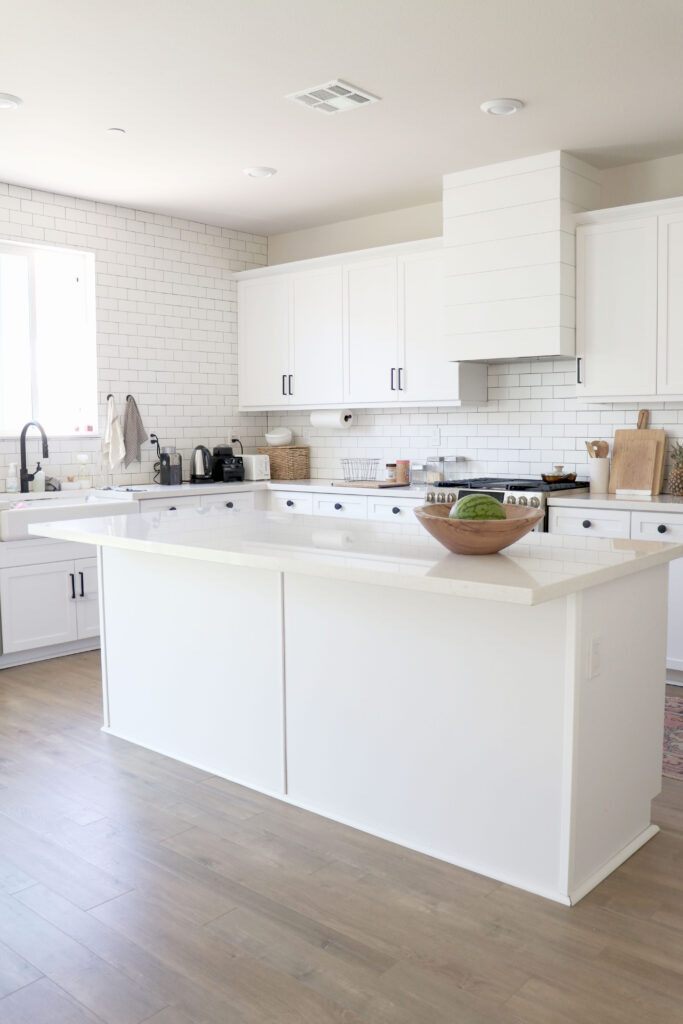
The island we started with was a basic builder quality island, with no real character, it is 85 inches wide, 25 inches deep and about 34 inches tall. We wanted to keep it simple but improve on what we had. This project is the simplest we have tackled in our kitchen/living space, but definitely one I needed to go slow. To make sure all of the measurements were as close to exact as possible. Any boards that were short, crooked or misplaced, even by a small amount, would stand out. So if you do something similar in your kitchen, take your time. Measure twice, cut once is my motto!
The pattern we decided on was a simple box pattern to reflect our kitchen cabinets, with 1×4’s as the new base boards and 1×2’s framing out the sides and top edge of the boxes. Because I did not want to special order any materials, I used what I could find in-stock at my local big box hardware store, and what I found is just a ½ inch thick. I chose this because I did not want the boards sticking off of the island too much or it would have looked more like construction framing, rather than finished carpentry.
Preparation Is Key To DIY Success
The first step was to prep the island. I removed all of the old moldings and edge/corner pieces. Lucky for us, our island was already a smooth surface, not textured drywall. If it had been textured drywall, then I would have needed to skim the surface with plaster to smooth it out (difficult) or cover over the drywall with ¼ inch plywood of some sort (expensive). But since our island was already smooth I did not have to do any more prep for construction.
Next I did a lot of measuring and marked out where I wanted all of my boards. I drew out the pattern and exactly where each board would go so I made sure it was all even. Measurements are never exact numbers so it is good to mark where you want everything and take good notes on the correct measurements. My vertical boards are 21-⅜ apart from each other and vary in length from 29 to 29-¼. Note: the builders did not build us a flat island, one side is ¼ inch higher than the other, this was fun 🙂
Adding Trim To Kitchen Island
To cut the boards for this project I used a miter/chop saw and to install the trim I used a brad-nailer with 18 gauge, ⅝ inch long nails. The trim just needs to sit in place so short nails are ok, and I did not want nails sticking through the walls into the island cabinets. I started with the 1×4’s along the bottom, I went all the way around the island, including on the cabinet door side.
After the new baseboards were installed I did 1×2’s along the top, this was just the front and sides, not on the cabinet side. Because the top trim ended at the cabinet doors, I cut a 45 degree angle to match up with a 45 on the vertical trim. This helps it all look more finished. When doing trim carpentry you want to avoid seeing the end of boards.
After the bottom and top trim were installed I moved onto the verticals. As I mentioned above, our island is not perfectly level so each vertical is a slightly different length. Because of this, I re-measured each piece before cutting and installing.
Most cuts were simple cross-cuts, but it got a little tricky on the ends of the island, where I had to do a small jog. Again, I did this with 45 degree angles to give a more finished look. When doing something tricky like making this jog, I measure what I think it should be and then make my cut a little long. I prefer to go back and cut a little more off rather than find out that I cut too short and start over.
After all the construction, it was just spackle, sand and paint… paint… paint. Third coat’s the charm when it comes to black!
Tips To Avoid A DIY Fail
Since I was only able to get these boards in a 3ft length, the long run of wood along the bottom is pieced together. To minimize seeing where two pieces meet I made those connections inline with the edge of the vertical boards. This essentially tricks your eye and you do no notice the lines where the wood meet.
The corners of the island were the most difficult. If I had simply placed two pieces of 1×2 next to each other, one side would have been a ½ inch thicker than the rest. So I trimmed a ½ inch, lengthwise from one piece.
To smooth everything out, I used plenty of wall spackle to fill in gaps and nail holes, and used both medium grit and fine grit sandpaper to achieve a smooth finished look. The island has two outlets, and I replaced those with black outlets instead of painting the white ones.
Supply List For Kitchen Island Upgrade
Here is a list of all the supplies needed to complete a similar DIY kitchen island with board and batten trim. Simply click on each item for a link to shop!
ECOS Paints
ECOS Eggshell Paint
Battery Nailer
Nails
Miter Saw
Oscillating Saw
Paint Roller
Foam Rollers
Paint Tray
Spackle Kit
Latex Caulk
Sanding Sponge
½ x 2 – 3ft Board (Need 12 total – May be sold individually at store or as 5-pack)
½ x 4 – 3ft Board (Need 10)
Black Replacement Outlets (USB-Charge)
Natural Eco-Friendly Paint
The paint we used is from our favorite brand, ECOS Paints. We went with their Eggshell Paint – line, which has a medium sheen and dries to a nice hard finish. ECOS recommends this for kitchens, bathrooms and other high moisture areas. And with two youngsters, it is great to have a highly washable paint. For the color, we matched a Sherwin Williams that Megan selected, called Tricon Black. As we painted the island, we were honestly a little hesitant about such a dark color, but once it was finished and the third coat had dried, we were very happy with the finished look!
Kitchen Island Before….
Here is how our kitchen island looked before…
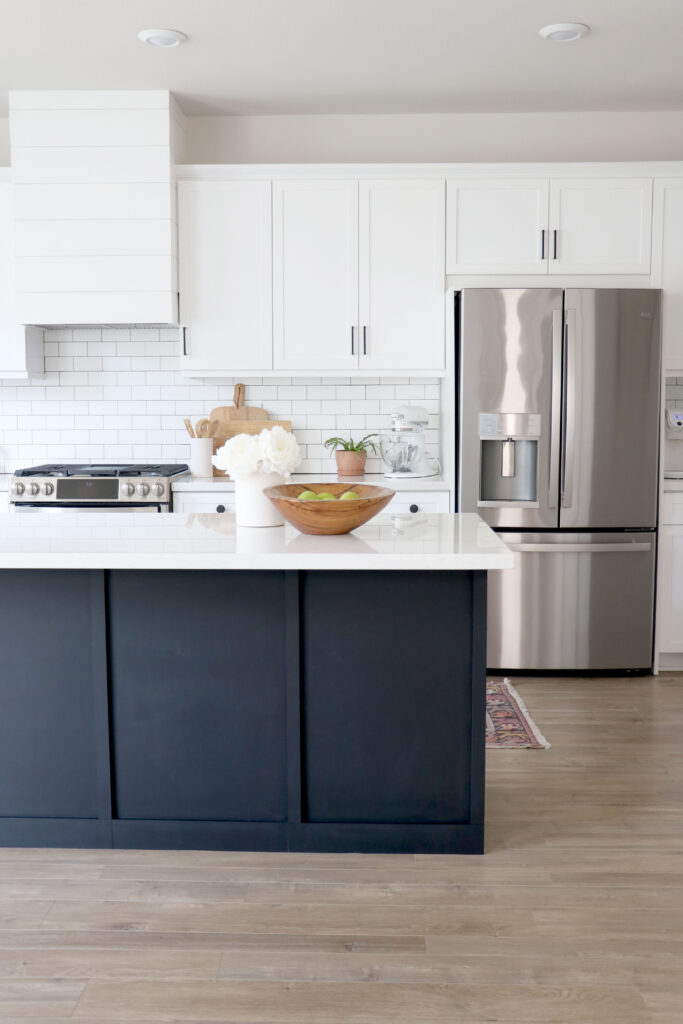
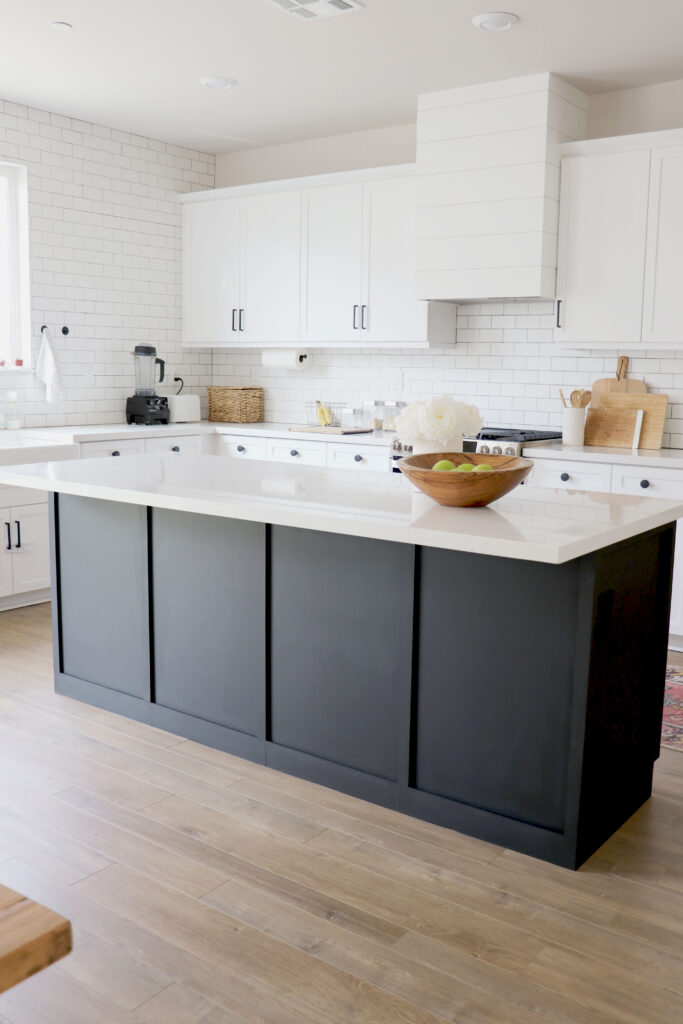
Kitchen Island After…
As you can see… it’s looks so much better!

MORE HGG DIY HOME PROJECTS
If you loved this project check out our other home projects….
How To Make A Large DIY Framed Chalkboard
DIY Shiplap Wall with Floating Shelves
DIY Shiplap Electric Fireplace Build with Mantel
Share With Us Your DIY Creations!
If you make anything similar, we’d love to see! Tag us on Instagram @HealthyGroceryGirl